This week you will exercise your ability to regulate the proper amount of light you capture in your photographs.
This will be the last assignment that you have this week, and it's optional. Yes, you heard me right. You don't have to do it if you don't want to. However, if you are missing any assignments, this would be an easy opportunity to make it up..
Your mission is to go out an take 3 photos of places, objects, or people at a specific time of the day.
You will then take the identical photo at a much different time of day.
You must take into account the amount of light that you are regulating into your camera using the correct F/Stop number for your aperture.
The criteria for success is to make sure that your photos are properly exposed, without being over, or under exposed.
Tuesday, January 19, 2010
Sunday, January 10, 2010
Friday, January 08, 2010
Vote for My Friend Peter Darchuk
I have been friends with Peter Darchuk since High School. Peter and I began 'The Danny Nutter Show', a public access variety show in Seattle, for 2 years. He has since moved on to L.A. to begin his film career and is currently enrolled in the Ultimate Filmmaker Competition.
I would appreciate you voting on this after we watch it this morning, and please send it on to any friends or family to have them vote on it as well.
Click HERE to watch and vote.
I would appreciate you voting on this after we watch it this morning, and please send it on to any friends or family to have them vote on it as well.
Click HERE to watch and vote.
Sunday, January 03, 2010
Your CPE Project and the Rest of the Semester
I hope it was an enjoyable break for all of you!
We will have a couple of photography assignments remaining for the rest of the break, while you simultaneously work on your CPE project.
This week we will be focusing on the following components of your CPE project:
1. Creating templates for your DVD artwork, which includes the Front, Inside, Spine, and Back artwork.
2. Creating an iMovie Project in the 'Previous Version' of iMovie software. This will include learning all about the 'Ken Burns Effect' if you choose to use this for your CPE movie.
3. Exporting your CPE movie to iDVD.
Your CPE project is due by the last day of the semester on January 29th.
IMPORTANT! YOUR C.P.E. MUST BE TURNED IN WITH YOUR COVER, INSIDE COVER, AND BACK COVER CUT, AND INSERTED INTO YOUR JEWEL CASE. PROJECTS UNCUT AND WITHOUT A JEWEL CASE CAN ONLY RECEIVE A MAXIMUM OF 75%. REMEMBER TO WORK ON YOUR COVER EARLY SO YOU CAN PRINT IT OUT AND NOT HAVE TO WORRY ABOUT THE LAST MINUTE RUSH TO PRINT.
For this project you will be turning your photos into a video using iMovie. You can use the Ken Burns effect to navigate around individual photos or use your photos as stills, it's up to you.
You will give this project a face and name of your very own choosing and use it on the album cover, that will have a cohesive design with the text and imagery used on the inside of your cover. The end result will be a nicely packaged DVD that you will burn using iDVD.
What will your project be about?
Will you keep it, or give it to someone else as a gift?
Either way it should be something of meaning that you or someone you know can look back on when they're old and remind you about the little things that make up life in the year 2009/2010.
Here are the Requirements:
1. The C.P.E. DVD must be a minimum of 6 minutes long with the title of your project and your name at the beginning of the video.
2. The C.P.E. DVD must have an audio track of at least 1 or more songs of your choosing. (I find that it's always best to find music that fits the mood or theme of the photos you're presenting, but that is not a requirement for the C.P.E.)
3. The C.P.E. DVD must have a cover that you design in Photoshop CS3. The project template will be 9.50 in Wide x 4.75 Height with a resolution of 300. Use your 'Ruler Guide' to mark the center of your project. This is where you will fold your project to make the Cover and the Inside Cover. Both will have a cohesive look them that will add to the overall look of the C.P.E.
4. The Back art is 5.85 inches Wide X 4.75 inches High. You will place a ruler guides at 0.240 inches across and at 5.600 inches across to mark where your spine artwork will be located. You will include your name and the name of your project on both of these spines.
5. The C.P.E. will then be burned onto a DVD using iDVD.
The C.P.E. is dueby the last day of the semester and must be cut and inserted into a jewel case to receive full credit.
NOTE: Some of you might want to start out by designing your cover art and print it early so you don't get stuck on the final rush to print (which as you very well know takes a long, long, long, long, long, long time.) Think about it.
Without cover art the most you can get on this project is a 75%.
Don't wait on this project! Get out and take some great photos, Rock the C.P.E., and most importantly, have fun!
Friday, December 04, 2009
Ah, Reflections
Your next assignment is to go out and take 20 photos of the 'One Thing' via any type of reflection.
That's it.
Have fun!
That's it.
Have fun!
Monday, November 23, 2009
Life as You Know It
What do you want to remember about this time in your life when you're old and gray?
You are to take 30 photos that you will hopefully want to include in your C.P.E.
Utilize at least one rule of composition in each of these photos. This assignment is due by the beginning of class on Friday, December 4th.
Wednesday, November 18, 2009
Line/Texture/Pattern
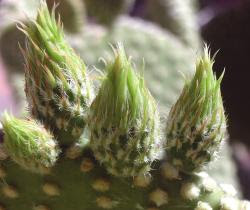
Texture - Lines - Cactus Photo
_____________________________________________________________________________________
Guggenheim Museum Frank Loyd Wright was a master of line and pattern in the buildings he designed. One of the most famous is the Solomon Guggenheim Museum in New York City.
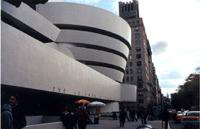
Take a virtual view of the museum and compose your own photograph using the lines and patterns he drew into this building.
Assignment: Capture 20 images that explore line, texture and pattern in the world around you.
5 out of these 20 photos MUST use Line, Texture, AND Pattern, all in one.
5 out of the 20 photos MUST also use extreme 'hard lighting' using a single light source to accentuate the detail in the texture.
Criteria for Success: Your work should show experimentation with composition, macro camera settings, using hard lighting to accentuate texture and pattern, using of depth of field to limit and expand focus, use Photoshop tools when appropriate.
Eye Candy! - We're looking at images that will catch your eye. You'll find examples of lines, patterns and texture in everyday places. Use them to create strong images with lots of contrast.
Lines Photo 1
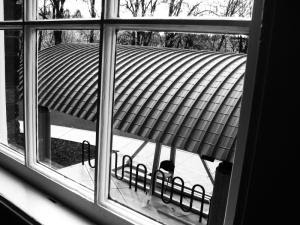
In this photograph the window frame literally frames the image of the patterns on the roof. Using one object to frame another is a great way to add depth to your photos. Experiment with a frame that adds contrast in terms of light or texture when compared with your subject.
Lines second photo
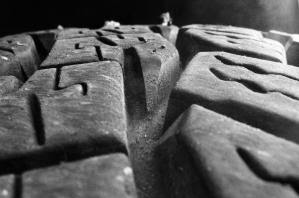
This photograph used the macro function of the camera to capture the texture of an everyday object, tire tread. The image was enhanced with more contrast and the sharpen filter. You'll find lots of examples of lines, patterns and texture on cars. The macro setting on your camera will let you focus on objects only inches away.
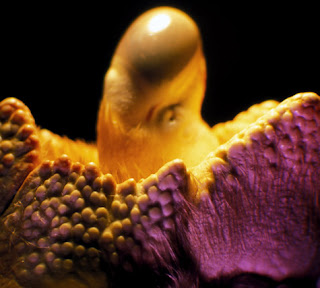
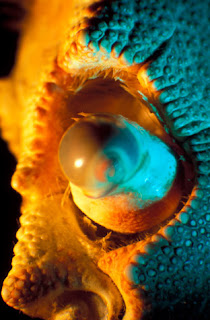
Texture contrast
In these images from Mark Moody's website, we see the macro used on the crab's eyes. There is contrast in color as well. Notice how the angle of the shot creates an impression of size. This photo would not have the same impact if it didn't use hard lighting.
_____________________________________________________________________________________________________
Implied Lines
This photograph uses objects in a line. You'll have to scout around for these images but keep your photographic mind's eye open and you'll find them!

_____________________________________________________________________________________
Guggenheim Museum Frank Loyd Wright was a master of line and pattern in the buildings he designed. One of the most famous is the Solomon Guggenheim Museum in New York City.

Take a virtual view of the museum and compose your own photograph using the lines and patterns he drew into this building.
Assignment: Capture 20 images that explore line, texture and pattern in the world around you.
5 out of these 20 photos MUST use Line, Texture, AND Pattern, all in one.
5 out of the 20 photos MUST also use extreme 'hard lighting' using a single light source to accentuate the detail in the texture.
Criteria for Success: Your work should show experimentation with composition, macro camera settings, using hard lighting to accentuate texture and pattern, using of depth of field to limit and expand focus, use Photoshop tools when appropriate.
Eye Candy! - We're looking at images that will catch your eye. You'll find examples of lines, patterns and texture in everyday places. Use them to create strong images with lots of contrast.
Lines Photo 1

In this photograph the window frame literally frames the image of the patterns on the roof. Using one object to frame another is a great way to add depth to your photos. Experiment with a frame that adds contrast in terms of light or texture when compared with your subject.
Lines second photo

This photograph used the macro function of the camera to capture the texture of an everyday object, tire tread. The image was enhanced with more contrast and the sharpen filter. You'll find lots of examples of lines, patterns and texture on cars. The macro setting on your camera will let you focus on objects only inches away.
Texture contrast
In these images from Mark Moody's website, we see the macro used on the crab's eyes. There is contrast in color as well. Notice how the angle of the shot creates an impression of size. This photo would not have the same impact if it didn't use hard lighting.


_____________________________________________________________________________________________________

Implied Lines
This photograph uses objects in a line. You'll have to scout around for these images but keep your photographic mind's eye open and you'll find them!
Subscribe to:
Posts (Atom)